
作者:ChenZhen
本人不常看网站消息,有问题通过下面的方式联系:
- 邮箱:1583296383@qq.com
- vx: ChenZhen_7
我的个人博客地址:https://www.chenzhen.space/🌐
版权:本文为博主的原创文章,本文版权归作者所有,转载请附上原文出处链接及本声明。📝
如果对你有帮助,请给一个小小的star⭐🙏
axios在vue中的安装
可以通过以下方式安装和导入 Axios:
npm install axios
然后,你可以在 Vue 组件中导入 Axios:
import axios from 'axios';
当然,我更喜欢先自己封装一下axios来使用。
创建一个request.js文件在文件夹utils下。
import axios from 'axios'
import Vue from 'vue';

const request = axios.create({
	baseURL: 'http://localhost:8082/', // 添加您的固定请求路径
    timeout: 5000 // 设置请求超时时间(可选)
  // 您可以在这里添加其他的 Axios 配置
})

// request 拦截器
// 可以自请求发送前对请求做一些处理
// 比如统一加token,对请求参数统一加密
var tokenValue = sessionStorage.getItem("tokenValue")
request.interceptors.request.use(config => {
    config.headers['Content-Type'] = 'application/json;charset=utf-8';
    config.headers['satoken'] = tokenValue
 // config.headers['token'] = user.token;  // 设置请求头
    return config
}, error => {
    return Promise.reject(error)
});

// response 拦截器
// 可以在接口响应后统一处理结果
request.interceptors.response.use(
    response => {
        let res = response.data;
         if(res.code == 20001){
            Vue.prototype.$message.error(res.message); //调用element-ui的消息提醒样式
        }
        // 如果是返回的文件
        if (response.config.responseType === 'blob') {
            return res
        }
        // 兼容服务端返回的字符串数据
        if (typeof res === 'string') {
            res = res ? JSON.parse(res) : res
        }

        return res;
    },
    error => {
        console.log('err' + error) // for debug
        location.replace('/login')
        return Promise.reject(error)

    }
)


export default request
在main.js中进行全局引入
import request from './utils/request';
Vue.prototype.request = request; // 在 Vue 原型上添加 request 对象,以便全局使用
main.js:
import Vue from 'vue'
import App from './App.vue'
import router from './router'
import ElementUI from 'element-ui';
import request from './utils/request';

// import 'element-ui/lib/theme-chalk/index.css';
import './assets/css/element-ui-index-newstyle.css'
Vue.use(ElementUI);
Vue.config.productionTip = false

Vue.prototype.request=request

new Vue({
  router,
  render: h => h(App)
}).$mount('#app')
在其他页面使用的时候只要用this.request来代替axios对象即可。
this.request.post(`/classes`,{
          name: this.formInsert.name,
          department:this.formInsert.department,
          teacher : parseInt(this.formInsert.teacher, 10)

      }).then(resp => {
        this.dialogFormVisible=false
        if(resp.code == 20000){
          this.$message({
            type: 'success',
            message: '添加成功!'
          });
        }else if(resp.code == 200001){
          this.$message({
            type: 'error',
            message: '添加失败!'
          });
        }

        this.query()
      })
axios的基本用法
axios是一个ajax框架,简化了各种ajax操作,有强大的ajax操作功能。
其实axios已经用了很多次了,但是每次用之前都会忘记一些内容,做项目途中经常要去网上查axios的一些用法,这次记得了结果下一次又忘了。。。。
很多基础的东西也都忘了,由于之前一直使用的是渲染模板引擎Thymeleaf连最基本的"session只存在于后端"都能忘。每一个axios请求都是不同的session,所以以前的用session来判断用户,在前后端分离已经不适用了 这次把经常用到的东西整理出来放到这里
GET请求
GET请求默认只能发送普通请求参数
// 为给定 ID 的 user 创建请求
axios.get('/user?ID=12345')
  .then(function (response) {
    console.log(response);
  })
  .catch(function (error) {
    console.log(error);
  });

// 此处then方法也可以写为:
axios.get('/user?ID=12345')
  .then(res => {
    console.log('数据是:', res);
  })
  .catch(function (error) {
    console.log(error);
  });


// 上面的请求也可以这样做
axios.get('/user', {
    params: {
      ID: 12345
    }
  })
  .then(function (response) {
    console.log(response);
  })
  .catch(function (error) {
    console.log(error);
  });
POST请求(三种不同类型参数)
1. json格式的请求参数:
xios.post('/user', {
    firstName: 'Fred',
    lastName: 'Flintstone'
  })
  .then(function (response) {
    console.log(response);
  })
  .catch(function (error) {
    console.log(error);
  });
注意:此处请求与jQuery完全不同。
jQuery如果按照此处直接传json对象的参数的话,后台应该使用request.getParameter方式接收,也就是说默认为表单提交类型,即application/x-www-form-urlencoded,如果是对象,后台springmvc中直接使用对象接收即可。
axios如果直接传json对象,默认认为是json格式传参,即application/json,也就是以流的形式提交,后台必须使用@RequestBody方式接收参数。
2. 普通的请求参数
如果想使用post方式发送普通的请求传参,有两种方式:
这种参数一般属于查询参数。
// 1、使用?号
axios.post("http://localhost:8080/add?id=3&name=mary&sex=n").then(function(resp){
			if(resp.data.code == "10000"){
				alert(JSON.stringify(resp.data.data));
			}else{
				alert(resp.data.desc);
			}

		});

// 使用params
// 如果使用普通的post传参,需要使用第三个参数才能用params的方式
		axios.post("http://localhost:8080/add", null, {
			params:{
				id:2,
				name:"张三",
				sex:"男"
			}
		}).then(function(resp){
			if(resp.data.code == "10000"){
				alert(JSON.stringify(resp.data.data));
			}else{
				alert(resp.data.desc);
			}
		});
3. 表单格式参数(x-www-form-urlencoded)
axios默认的请求是:headers:{Content-type:‘application/json;charset=UTF-8’}
如果想要以form Data的形式传递参数,只要修改 {headers:{‘Content-Type’:‘application/x-www-form-urlencoded’}}。
axios.post(url,{
        name:'zhang',
        age:'15'
    },{
        headers:{
            'Content-Type':'Content-Type':'application/x-www-form-urlencoded;charset=utf-8'
        }
    })
然后需要用到一个qs库,用于转化成正确的键值对形式的格式,这个是axios中已经包含了的,不需要再下载相应的包了。一定要注意键值形式的转变,使用方法:
import qs from 'qs';
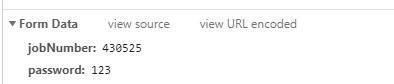
axios.post(url,qs.stringify({jobNumber: '430525', password: '123'}), {
headers: {'Content-Type':'application/x-www-form-urlencoded;charset=utf-8'}
});
完成效果如下:
SpringMVC如何接收表单格式参数
一、四种接收提交参数的方式
1.方法参数直接接收表单域的值。
例如这个接口,表单提交的参数会直接映射到方法参数上
@RequestMapping("/submit")
public String submit(String name, String id)
2. 使用最初的HttpServletRequest对象的getParameter方法来获取值
@RequestMapping("/submit")
public String submit(HttpServletRequest request){
    System.out.println(request.getParameter("id"));
    System.out.println(request.getParameter("name"));
    return "test";
}
3. 用bean来接收
@RequestMapping("/submit")
public String submit(Tag tag){
    System.out.println(tag);
    return "test";
}
并发请求
// 执行多个并发请求
function getUserAccount() {
  return axios.get('/user/12345');
}

function getUserPermissions() {
  return axios.get('/user/12345/permissions');
}

axios.all([getUserAccount(), getUserPermissions()])
  .then(axios.spread(function (acct, perms) {
    // 两个请求现在都执行完成
  }));
同时进行多个请求,并统一处理返回值
axios.all(iterable)
axios.spread(callback)
例:
axios.all([
  axios.post('/add',{name:'wq',age:20}),
  axios.detete('/delete',{id:1})
]).then(axios.spread((add, del) => {
  console.log(add, del);
axios的参数配置
axios({
  method: 'get', // post、get、put....
  baseURL: '', // 请求的域名,基本地址,公共的路径
  url: '', // 请求的路径
  params: {}, // get参数会将请求参数拼接在url上
  data: {}, // post会将请求参数放在请求体中
  headers: {}, // 设置请求头,例如设置token等
  timeout: 1000, // 设置请求超时时长,单位:ms
})
其他写法 注:参数带[]表示不是必填参数,没有[]表示是必填参数
axios.request(config)
axios.get(url, [config])
axios.post(url, [data], [config]])
作者:ChenZhen
本人不常看网站消息,有问题通过下面的方式联系:
- 邮箱:1583296383@qq.com
- vx: ChenZhen_7
我的个人博客地址:https://www.chenzhen.space/🌐
版权:本文为博主的原创文章,本文版权归作者所有,转载请附上原文出处链接及本声明。📝
如果对你有帮助,请给一个小小的star⭐🙏